Travel photography, stock photos, fine art prints, and travel blog by Manchester, UK photographer Darby Sawchuk.
Every notable landmark seems to have one thing in common: visitors, and lots of them. But if you want that postcard shot or that image that shows how the location may have once appeared, you have a challenge ahead of you. This digital photography and PhotoShop tutorial will provide a means to remove the tourist throngs from your vacation images.
The technique I will describe here applies to photos you have yet to take. Unfortunately, there is no single easy way to get rid of people in the shots you already have. But instead of agonizing over long clone-stamping sessions, you can take shots that will yield vacant sites with only minimal PhotoShop work.
To start, you’ll want to be taking your photos with a tripod. A remote release or timer will also help (it will minimize the possibility that you may inadvertently move your camera between shots). You will also want to shoot using manual settings. As the scene changes, your camera meter may change your exposure values and that will make your PhotoShop work more difficult.
At busy sites, once you have composed your shot, you will find there is no end of tourist flow through your frame. You may find yourself quickly giving up on an image because you know that as soon as one group of visitors starts leaving, another will soon take its place. You might get lucky and everyone will flee the scene, but if you are short on time and/or patience, you may not be able to hold out forever.
The trick is, with your tripod-mounted camera, you can take your shot with people in it. Then, once people have moved a bit, you can take a second photo.
As an example, look at this photo I took at the ruins of Ta Prohm in Cambodia near Angkor Wat:
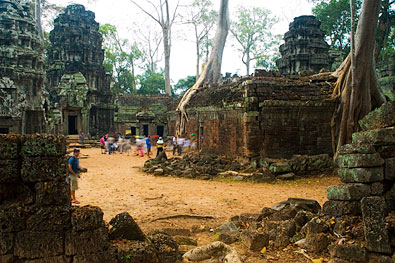
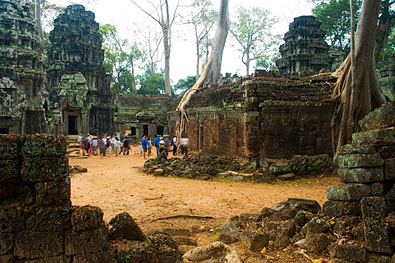
A lot of tourists loitering in the scene don’t make for such a great photo of a place that evokes imagery of explorers discovering a long-lost ruin. But with a little patience, I was able to get another shot of the scene with fewer people:

What’s important to note in this scene is where the tourists are and where they are not:
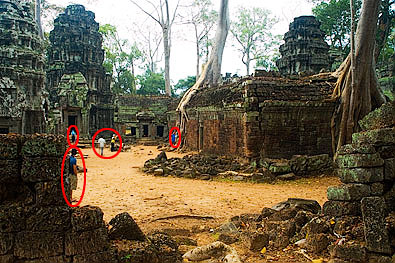
Make a mental note of the parts of the scene that were occupied by people. Then, as those parts of the scene empty, take a shot. The rest of the scene doesn’t need to be vacant, just the parts that were previously full:

Now, while still thinking of our mental note of what areas need to be vacated, we can still see one man occupying part of the photo. When he moves, we can take our final shot.
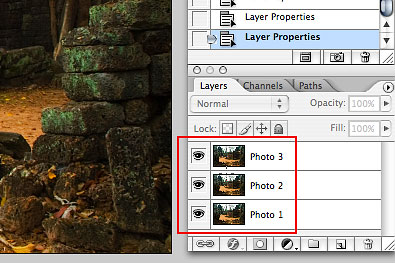
Once you have your sequence of shots you will want to open all of them up in Photoshop then copy and paste all of them into a single document as separate layers with your first shot as the bottom layer in the document. If you are shooting in RAW format, make sure that if you change settings for one of the images, you make the same changes to all of the images so that their exposures, white balance and other settings match.
If there are small differences between the alignment of your images, select the Move Tool and use the arrow keys to nudge the layers into alignment. A handy trick for this is to change the blending mode of the top layer to “Difference,” then nudge the layer using the arrow keys. The closer the resulting image is to black, the better the alignment. Once you have finished the alignment, change the blending mode of the top layer back to “Normal.”
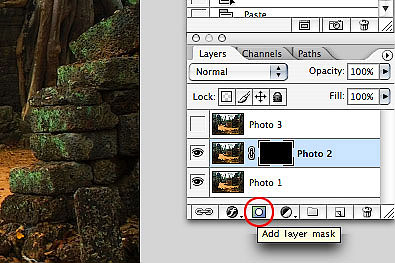
For now, we will make the top layer invisible (click the eye icon next to the Photo 3 layer). Next with the Photo 2 layer selected, create an empty mask for that layer, by clicking the mask icon while holding down OPTION on the Mac and ALT on the PC. Your mask should now be black and the entire layer is hidden.
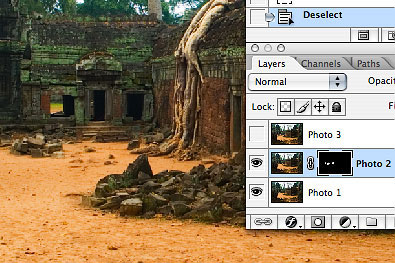
Now it’s time to get rid of the people in your photo. Select the brush tool and use a brush with a feathered edge. Make sure the foreground colour is white, then Start painting into the mask of the Photo 2 layer in the places occupied by tourists. You will see the people magically disappear from the image!
Once you have removed as many people as you can by painting on the Photo 2 layer, make the Photo 3 layer visible, create an empty mask for it and paint out the remaining person. If you have to take more than three photos, keep repeating the process to erase any remaining stragglers.

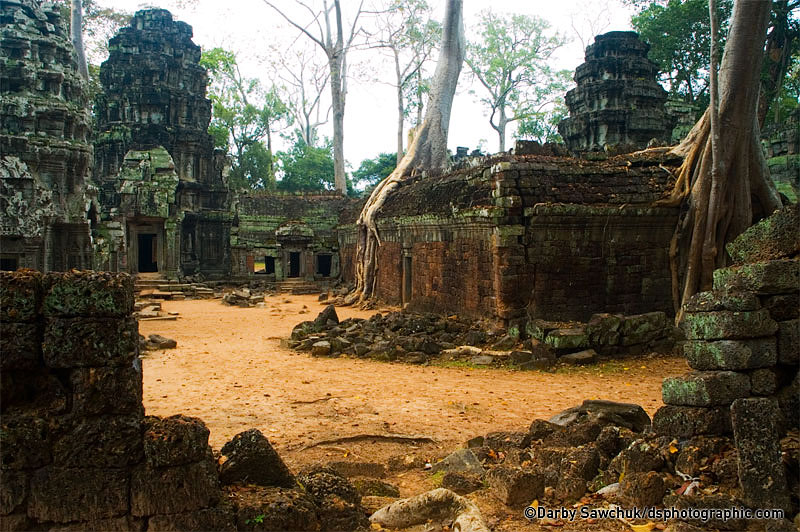
You now have a landmark free of people!

Click here to see a larger version. And check here for more of my photos from Ta Prohm and Cambodia.
While shooting, if you waiting for any appreciable period of time between shots, the light in the scene may have changed. Once you have completed your masking and removed the people, you may be able to discern differences in lighting in the areas where the people were and where they now are not.
If the difference isn’t too off, you can correct this by making active the layer where the people are not present. Then, you can either any of PhotoShop’s tools in the “Image > Adjustments” menu to correct the change in light between the shots.
 Darby Sawchuk is a Canadian-born photographer who currently resides in Manchester, England. He has travelled to over 40 countries and is always adding more to the list. He creates stock for multiple agencies and is available for assignments.
His work has appeared in such publications as: Men's Journal, New York Magazine, Globetrotters Guides, Footprint Guides, Western Living Magazine, The Telegraph, Forbes Traveler, Country Explorers and more. Read more.
 +44 0790 992 8932

 Subscribe to entries
Subscribe to comments
 Darby Sawchuk on Twitter
thanks for this most excellent tutorial. digg +1
Holy shit you are a genius and I want your babies!
This is a very handy tip. Thanks!
Fantastic, more more more!
Thanks everyone. Nice to know it’s helpful!
This tutorial cured me of leprosy!! Would highly recommend!!1
lol. Glad I could help!
i can already think of a number of uses for this, thanks for taking the time to put this tut together.
This is a super technique and I can see that it works really well where there are just a few people milling around those ruins. But if the only time you can visit the Leaning Tower of Pisa is mid morning say, your stuffed, as soon as one person moves a foot to their left, someone’s jostling in from behind to fill the gap. I guess an alternative in situations like that, other than simply finding a new angle to shoot from is to use a very long exposure so that the people become nothing more than a blur, which would make for quite a nice, interesting shot anyway giving a sense of just how busy such a tourist trap can be.
Brilliant! Like cloning in reverse. Why didn’t I think of that!
I would like to add that the reverse technique can be used to create the illusion of more people. 😉 Or, similarly, a sequence of photos of someone walking across a scene can be constructed for a nice effect.
Anyway… good stuff. 🙂
Cheers
-jxn
“Holy shit you are a genius and I want your babies!”
Ha ha, just don’t expect to see them in any family photos!
This stuff is so good, i want to shoot it into my veins.
A swiss company (FutureLab) has made an online tool that does exactly the same, but doesn’t require the pictures to be taken with a tripod (although it’s better to use one if you want better results)
And it’s called… “Tourist Remover”.
See it here: http://www.snapmania.com/info/en/trm/howto.html
These tutorials are great. Have you considered doing Gimp tutorials? They would be useful to so many more people, considering Gimp doesn’t cost hundreds of dollars.
Thank you!!!!!!
So patience and a cloudy day required, this technique designed for the british 🙂 Great technique, will give it a go at some point.
Ha I used this technique for getting people empty room pic on an online chat game.
I guess this is one way.
Another way is to have your camera mounted on the tripod.
If you are using an SLR where you control the exposure time, then aim to take a 30 second to 60 second photo. Anyone moving through the viewfinder will not be recorded. If there is someone standing in the photo, they will obviously be recorded.
Try photographing a building with people coming and going. It will look like no one was ever there. This is an old pro photography method used before the days of photoshop. Tried and true.
nice tutorial man… some stuff in there that seems obvious, if you stop and think about it.. I guess I never did though so thanks for writting this.
I just came back from a month in Italy, took far too many photos.. and though I tried hard to keep tourists out of my photos, it never occurred to me to take more than one photo of something and then mask out the tourists. awesome
dugg and del.icio.us’d 🙂
A gun is so much easier.
simple, but effective …. I can see me using this a lot
/me discreetly puts newspaper over hard-on
say what?
I’ve gotten similar results, with less effort, can be obtained from Group Shot.
Download it from here: group shot
But what if your picture where your background full of tourists including those standing behind you? Wonder how can I remove it too?
Interesting idea:
What if you took a picture of some hum-drum place that really SHOULDN’T be considered a tourist trap, reversed this process and made it look crowded?
“Look here at all the people milling about the public restroom made famous by the former lead singer of Wham, George Michael!”
Cool. Nice work
Simply marvelous!
When things start getting to complicated.. STOP THINK… there is always a much simpler way to do the same. Simply super!
Dear Sir,
Thank you and Best Regards,
Mehran Ali Kadivar
What if you only have 1 picture?
Then it’s time to break out the clone stamp tool!
Nice tip, will stop me from screaming “There’s a bomb! Move to safety behind me!” again.
Instead of using masks, why not just order them differently and use the erase tool? That’s what i’ve done, works just as well.
Because using masks is non-destructive. Correcting any errors you make is easier using masks than it is once you’ve used the eraser.
This is great. My wife and I got married on the beach in Hawaii 7 years ago, early Pshop V1 or V2ish time frame. Our photographer was able to get most of the tourists out in the final prints using a similar technique, but we still have one picutre where a person simply wouldn’t move. It is a great memory, but I still wish we could have clipped them.
Thanks for the tutorial.
very excellent technic. thanks for sample
A friend of mine uses a similar technique with bracketed images allowing him to have the optimum exposure for every part of the scene.
Long exposures have already been mentioned, but that begs the question, “How do I deal with bright sunlight?” The answer is neutral density filters (ndf). With a tripod and an ndf (or stacked filters) you can drag exposure time out to a minute or longer. It’s how you get Grand Central Station to look like it’s empty without having to shut the place down.
Thanks for a great tutorial.
I hate having tourists in my pictures. Thanks for a great tip!
Excellent and detailed tutorial – worth a digg.
Please feel free to add to http://www.photographyvoter.com
Love, Love all the advice!!! Glad i went to it.
Wow! I’ve to try it right a way. It is a helpful tip. Thanks for sharing.
Thanks for this great tip. I only wonder if this can also be done in FireWorks. Maybe we can look to see an alternate tutorial for that in the future?
OR YOU CAN JUST SET LONG EXPOSURE SO THERE WON’T BE ANY PEOPLE IN THE PICTURE BUT YOU WILL HAVE TO DO A LITTLE COLOUR AND BRIGHTNESS CHANGES AFTERWARDS…
No need to shout. 😉
As for that, it’s not always possible – this tip is for those occasions.
thank you good tutorial
wooow realy good job
Amazing.
Cool. Nice work
Good tip but if you don’t have a tripod of are in a place that doesn’t allow you use one then set you camera on manual (so you focus and metreing is the same for ever shot) take multiply shots.
Remove the people from every shot using PS
Use Photomerge then crop the end result.
bingo!
Photoshop CS3 Extended has a new tool that does this for you automagically…it’s called STACKS.
Great tutorial with very practical advice!
Very nice! Thanks!!!
wonderfull
Neat tutorial, for amateurs. Just brush up on your Photoshop skills people and you wont have to take multiple shots that take up space on your memory cards and HDs. One shot and the stamp (or heal) tool is all you need. Thanks for sharing.
No, Sergio, that is just dumb. If you are going to just photoshop the whole world, you might as well not bother with a photo. Just dial up your blank canvas and start painting.
Some people actually like to have photos of things which are there. If you want to make it up, be a real artist and buy yourself some paints.
Please sirs I am most confused and frustrated. No one seem to address this problems. What if I want people in my tourist photo? How do I leave them in there? Hope you can help. I am most dumb founded. Thank you.
This sure beats having to yell “MOVE” with a megaphone! 😉
It’s a great tutorial. It’s funny how simple and obvious solutions this is yet I never thought of it.
Thanks
That is so cool! Now I can go thru many of our photos and retouch them and place on our website!
Very nice! Thanks!!!
Thank you for the tip. It will be very useful!
thanks..
thanks..
thanks:
thank you
Actually sitting in Siem Reap, Cambodia at the moment….trying to figure out how to remove touists from my Ta Prohm and Angkor Wat photos…Now I know what it should look like!
Thanks
thanks man these will be a big help for me..
Fantastic – And so simple! Now I can get rid of all those unwanted tourists in my pictures… Thanks for sharing!
thanks
its very nice perfect project.
toooooooooooooo good
Nice trick! Thanks for this! No more using the clone brush to blend the background over them!
thanks…
thank u..
that’s good…
thanx
Great tip, Darby. I’m sure I will put this to use in the future, as people in my photographs really annoy me ;p
Cheers
Good article , thank You
thanks…
Great tutorial. Thank you, you make it look it’s so simple.
Paul
thanks a lot..
thanks.
thanx bro
thanks You 🙂
Thanks for all!
Thanks
Thanks for all!
thankss…
very good.
thanks for all
Great tutorial. Thank you, you make it look it’s so simple.
Paul
Great tutorial. Thank you, you make it look it’s so simple.
Paul
Great tip, Darby. I’m sure I will put this to use in the future, as people in my photographs really annoy me ;p
Cheers
thn,anx, pererct
thanks very beatiful photographs
Thnaks for your help..
thanks very beatiful photographs
i think original is best… i dont want to erase my tourists 🙂
Dear Sir,
Thank you and Best Regards,
These tutorials are great.
thank you very much..
i wanted to remove people but i have only one pic what i do?
Jen, you’re going to to have to hop into Photoshop and use the clone tool to the best of your abilities. Not much else you can do.
you dont have maybe other way beacuse with the clone that work dont good
I’m afraid I don’t have another way. The clone tool may be tricky, but with practice, you can really accomplish a lot with it. Good luck with it!
you dont have maybe other way beacuse with the clone that work dont good
Yeah, sorry for shouting a few years ago… 😀
As for question by Ücretsiz Fal and others that only have one photo, you should either try and perfect yourselves in cloning, which is the hard way, or you can try Photoshop CS5 which has Content-aware fill and Spot healing brush with content-aware preference… Those are the new Photoshop features and can only be found in Photoshop CS5 and Photoshop CS5 Extended… I tried those and can say that they indeed give absolutely phenomenal results and don’t require almost any learning…
Check out this video:
http://tv.adobe.com/watch/photoshop-cs5-feature-tour/contentaware-fill/
Cheers…
Great tutorial, someone above suggested creating a tutorial for this in gimp but I don’t think you’ve made one. Here’s a quick tutorial that I wrote that does basically the same thing, admittedly not as well, but with gimp: http://www.hydronitrogen.com/216/a-quick-gimp-tutorial-for-hiding-people/
Great post.Thanks.
Thanks for the article ..
Wow! I didn’t know you could do that.
Adobe Photoshop CS5 has a much easier and automated way to deal with this, once you have a set of picture of the site (with people in different places) you can go to File menu, click on Scripts, then Statistics and use the “Mean” stack mode to get rid of unwanted people in your picture.
Good luck!!
Yeah that feature was in CS4 Extended as well and it is worth a mention if you want something automated.
I do find that it sometimes leaves some ghosts in there though, so I tend to stick to a more manual approach.
great tutorial for any beginner.
Adobe Photoshop CS5 has a much easier and automated way to deal with this, once you have a set of picture of the site (with people in different places) you can go to File menu, click on Scripts, then Statistics and use the “Mean” stack mode to get rid of unwanted people in your picture.
Good luck!! yes tahnkss ı am learn
[…] Photoshop allows a great amount of flexibility to enhance pictures and totally alter them. How to Remove Tourists from Your Photos demonstrates a rather nifty technique used to cut out unwanted bystanders who wander into your […]
[…] blog dsphotographic.com has instructions on removing pesky tourists from your otherwise album-worthy photos–and […]
thank
I know that this is a pretty old post, but there is a more automated way to do this inside of Photoshop that doesn’t rely on local adjustments. All you do with this method is average a set of images together. It won’t be perfect with just three shots, but the more you take the better your output. This is perfect for setting up your camera on a tripod and just letting that shutter fly.
Load up your images using Photoshop’s “Load Images into Stack” script under File>Automate>Scripts.
Select your images, hit align if you shot hand held. Let Photoshop do its thing.
Then you have to hit CTRL+ALT+A to select all your layers. Go to layers, Smart Objects, convert to smart object.
With the smart object still selected go to Layer> Stack Mode> Mean.
This will average all of the images into one set that takes out any “random” data. This isn’t just meant for removing people, it’s actually exceptional for noise reduction. No loss of detail. The only downside is having a steady hand to shoot all those separate frames.
Good luck everyone!
[…] Trovi un paio di esempi di questo tecnica in questo tutorial. […]
[…] Every notable landmark seems to have one thing in common: visitors, and lots of them. But if you want that postcard shot or that image that shows how the locati… Read More » […]
[…] Darby Sawchuk […]
Fantastic! I want to shoot it Cape Town.
Great job!
congratulations for your advice! I also know some simple ways to improve vacation photos!
Wonderful, I want to shoot it Cape Town.
Hi, I do find that it sometimes leaves some ghosts in there though, so I tend to stick to a more manual approach.
Select your images, hit align if you shot hand held. Let Photoshop do its thing.